SHOWHOUSE SPOTLIGHT
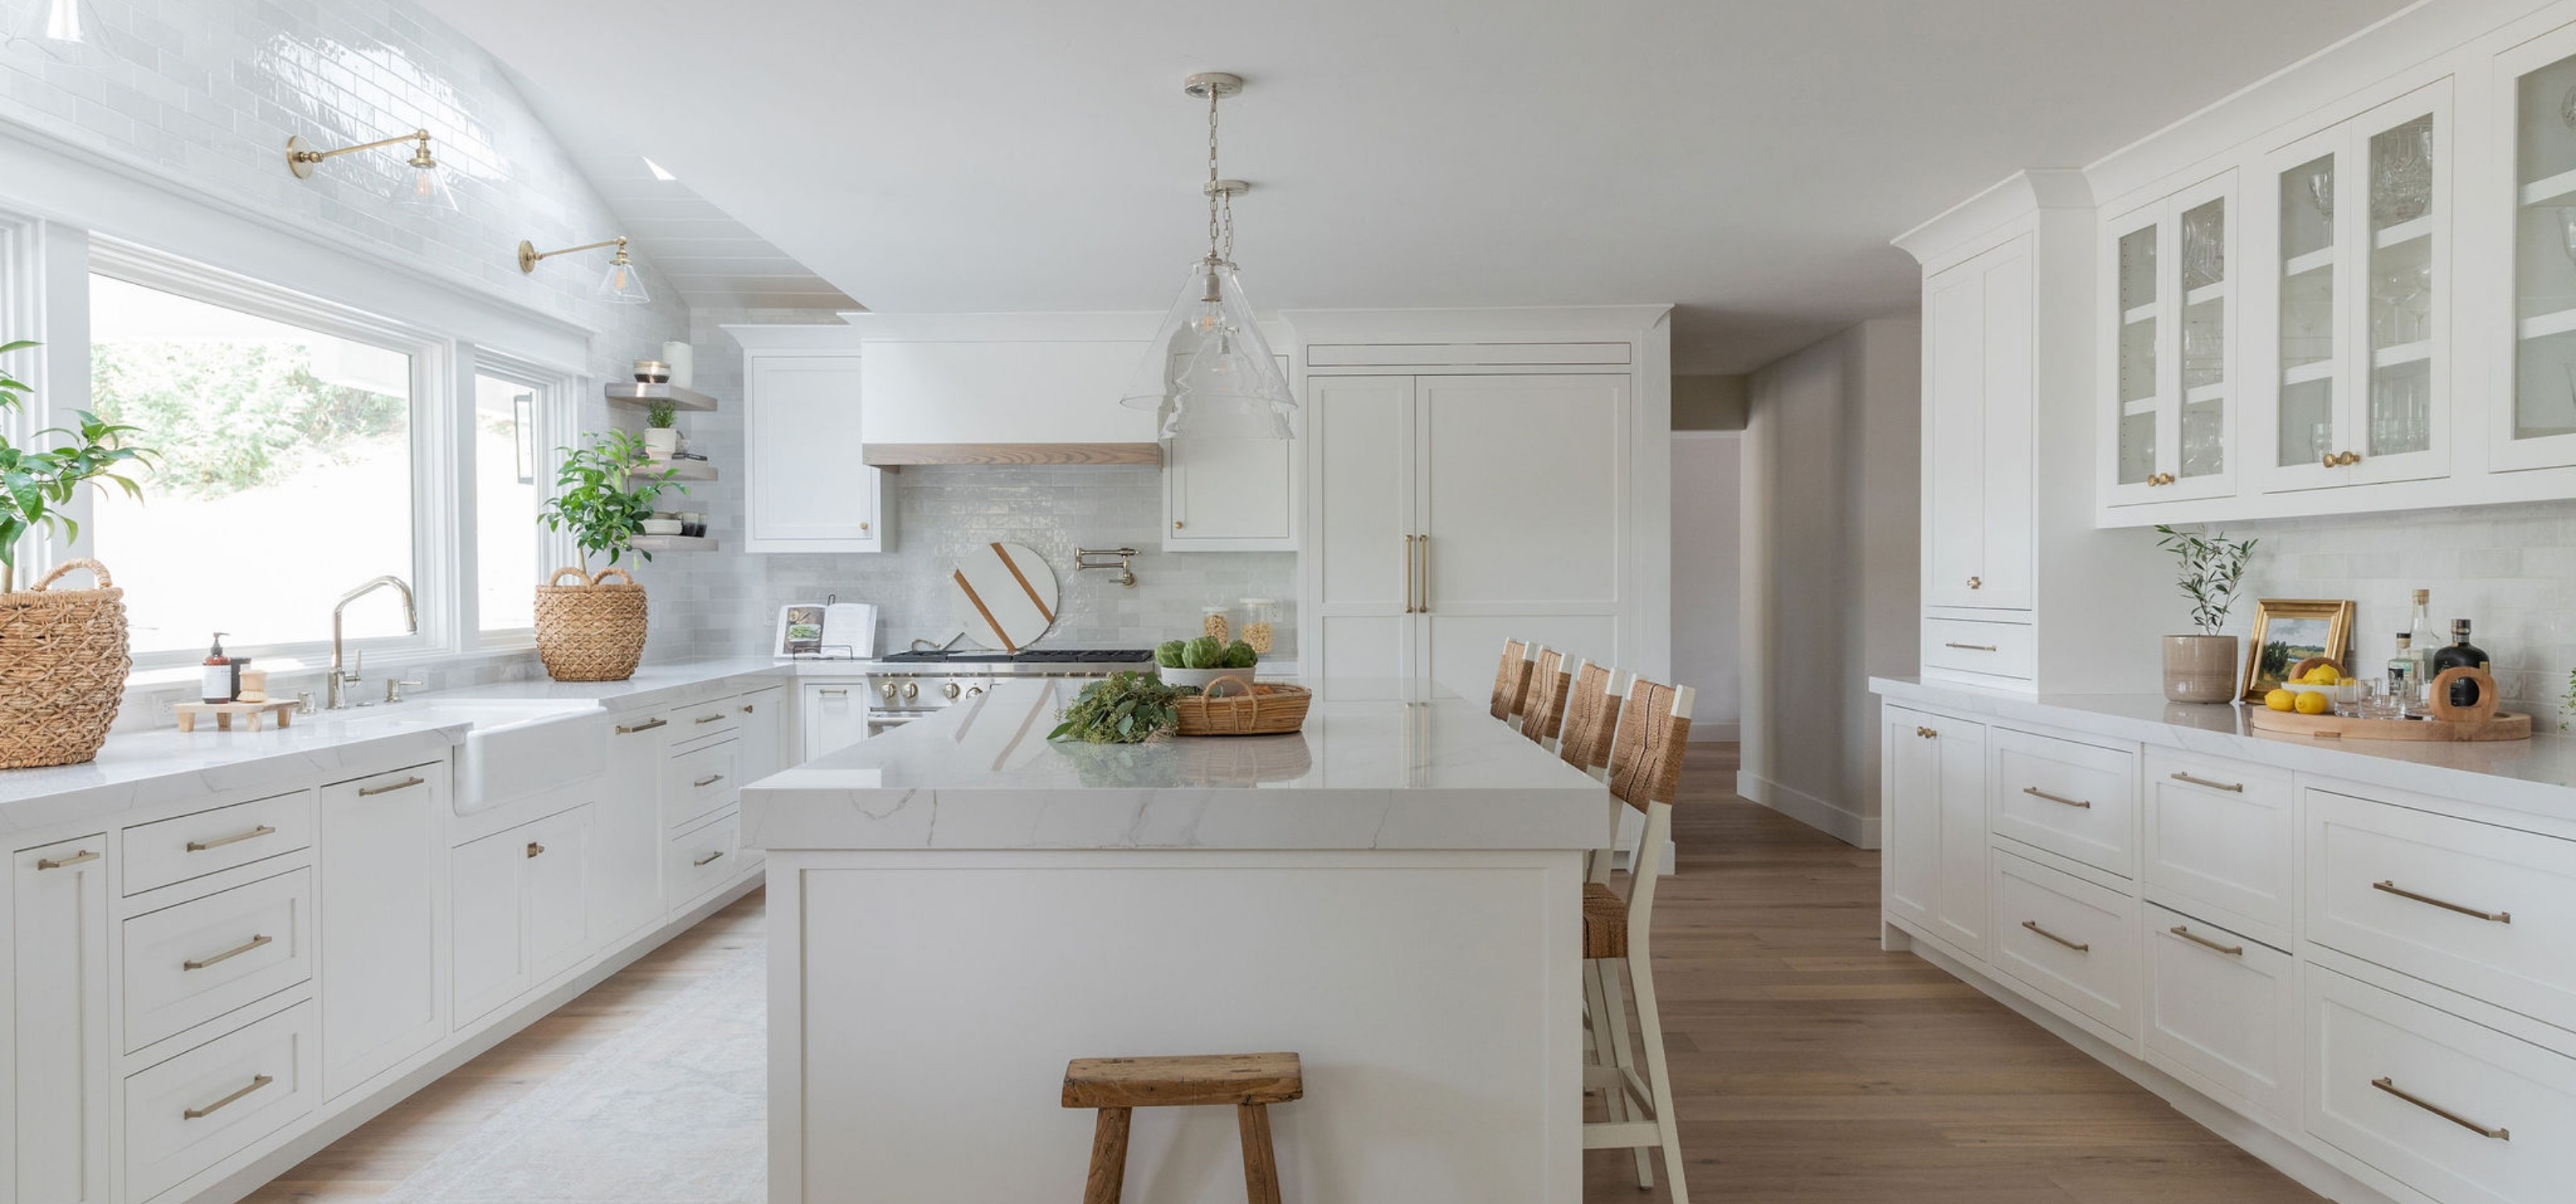
Six Ways to Design a Timeless Kitchen
Interior Designer, Nicole Salceda of Eye For Pretty, shares her top tips on mastering the most important room in the house.
Whether you’re daydreaming about a DIY facelift or going full steam into a gut renovation, every kitchen project benefits from a professional opinion. With so many factors to consider (looks, longevity, and sticky fingers, to name a few) we went straight to the expert: designer Nicole Salceda of Eye For Pretty. While her signature California-infused aesthetic balances warmth, modernity, and minimalism with a deep appreciation for nature, Nicole believes all well-designed kitchens have a few things in common — namely, style, function, and personality. In this guide, she shares expert advice on selecting finishes, optimizing layouts, layering light, and bringing in personal touches to curate a kitchen with timeless appeal.
Step 1: Plan Your Kitchen Design
Step 2: Blend Traditional & Contemporary Styles
Step 3: Bring In Some Texture
Step 4: Create Design Contrast
Step 5: Embrace Open Shelving
Step 6: Layer Your Kitchen Lighting

Robinson Large Pendant; Barrett Picture Light | Photography: Jessica Brydson

Robinson Flush Mount | Photography: Jessica Brydson
Step 1: Plan Your Kitchen Design
Before you get started, identify your priorities for the space. How will your kitchen be used, and how do you want it to feel? “The kitchen is the heart of the home, and it’s where most young and busy families spend most of their time,” Salceda says. Whether you’re gearing up for quick breakfasts before school or hosting guests for elaborate dinner parties, your lifestyle and cooking habits will help determine the ideal placement of appliances, storage, and seating areas. Ideally, your end goals will be manifest in visual elements like layout (U-shaped, L-shaped, open plan), materials, and finishes. Salceda advises her clients to focus on the base layer first. “Start by choosing your foundation elements: slabs, tile, cabinets, and appliances,” she says. “Then think about the second layer: lighting, furniture, and window coverings.” By fine-tuning a seamless flow of space, you’ll create a kitchen that reflects your unique needs and elevates your daily experience at home.

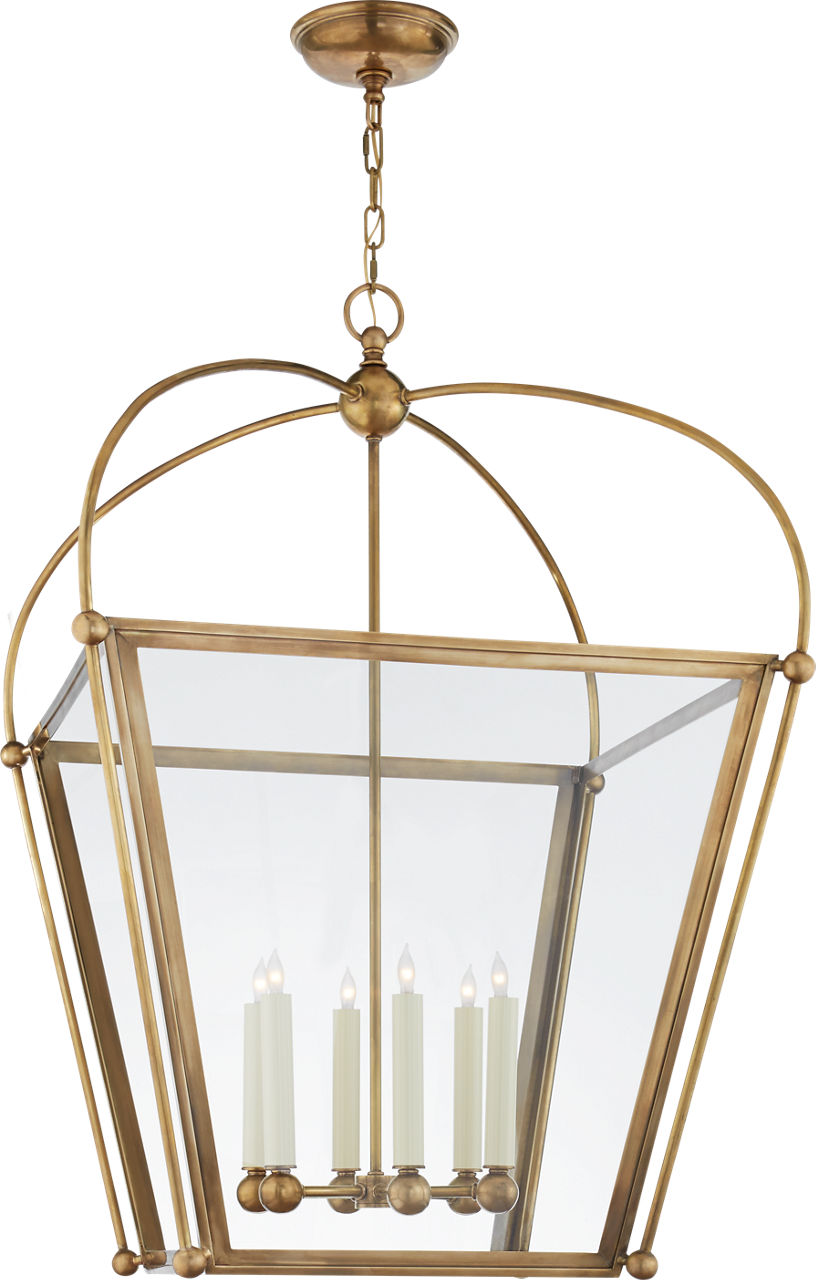
Riverside Large Square Lantern | Photography: Jessica Brydson

Parkington Double Library Light | Photography: Jessica Brydson
Step 2: Blend Traditional & Contemporary Styles
Great news: you don’t have to choose just one style. In fact, Salceda and her team are all about the mix. “We love to incorporate current trends like stained cabinetry and fluted details with time-tested elements, like patinated brass on the faucet or a vintage runner on the floor,” she says. Especially in a room like a kitchen, where design choices aren’t as easily swapped as, say, a pair of throw pillows, achieving a timeless look means integrating elements from different eras and aesthetics. In other words, truly enduring spaces consider current trends in a historical context — which means a kitchen that blends traditional elements (like aged finishes and crown molding) with contemporary touches (like sleek hardware and modern lighting) may be the most timeless kitchen of all.

Larabee Single Sconce | Photography: Jessica Brydson

Eugene Medium Pendant | Photography: Amy Bartlam
Step 3: Bring In Some Texture
You’ve heard it before, and we’ll say it again: incorporating natural textures helps to bring depth and calmness to any room — and the kitchen is no exception. “So many of the surfaces we love in kitchens, like natural stone, can be cold, so we balance that with lots of organic texture,” Salceda says. “A woven detail in the lighting, like the Antigua Sconce, or a linen shade, like the Larabee Sconce, can go a long way in softening a space.” While rattan and woven accents are certainly having a moment, the opportunities here are endless. Pro tip: Salceda often varies tonal textures within the same palette to elevate a room without adding any visual noise.

Brynne Medium Pendant | Photography: Amy Bartlam

Cabinet Maker Picture Light | Photography: Amy Bartlam
Step 4: Create Design Contrast
White kitchens will always be classic, but there’s no need to be one-note. “We’re finding that our clients enjoy the happy medium of mixing a stained island with painted perimeter cabinets, or a dark island with white cabinets mixed in,” Salceda says. Incorporating a few notably different colors or finishes (whether a subtler contrast or a dramatic shift in hue) helps to establish a stronger point of view in a space. And remember, playing with contrast isn’t just about paint colors. “In an all-white kitchen, we often bring in dark or black lighting fixtures to ground the space, like the Brynne Pendant in black, whereas in a dark kitchen, we tend to keep the lighting selections light and airy with an open pendant or a glass shade — we love the Katie Conical Pendant and the Robinson Large Pendant.”

Charlton Wall Light | Photography: Nicole Dianne

Goodman Small Hanging Light | Photography: Amy Bartlam
Step 5: Embrace Open Shelving
Open shelving has gained popularity in the “shelfie” era, but its enduring place in kitchen design owes to practical factors like efficient, convenient, accessible storage. “We always start on a practical note, placing functional items on lower shelves for easy accessibility,” Salceda says. “From there, we try to cluster groups of like items without over-accessorizing — the eye needs empty space to rest!” Taking a page from a prop stylist’s handbook, it helps to vary the height, scale, and proportion of items, stick to a monochromatic color scheme and let heirloom serving pieces shine on upper shelves. “We love to use library-style sconces on open shelving, like the Charlton Wall Light,” Salceda says. “Think of this as an opportunity to showcase special pieces you use and love.”

Parkington Single Library Light; Katie Conical Pendant | Photography: Nicole Dianne
Step 6: Layer Your Kitchen Lighting
A lighting scheme that layers ambient and task lighting is vital in designing a sophisticated, streamlined kitchen. Ambient lighting gently illuminates a room as a base layer, while task lighting highlights specific zones like islands, countertops, and storage shelves. On every project, Salceda starts by assessing the light afforded by windows and doorways and builds from what’s already there. "We do our best to take our cues from a kitchen’s natural light sources and consider the kitchen at different times of day,” she says. “Then we layer accordingly to complement and elevate the existing features of the space.”
Case in point: the kitchen pendant. While pendant lighting above an island provides a focal point and a well-lit workspace, the specific size and number of pendants (and the distance between them) depend on the size of the kitchen island. For smaller islands, it is usually best to center a pair of mini pendants above the space. For islands measuring more than 8 feet long, large pendants or linear pendants may be more appropriate. In any case, Salceda recommends paying attention to scale. "The conversation between pieces lends a sense of balance to a space. We do many pairs of pendants over an island — the Piatto, the Eugene, and the Limoges are some of my favorites. Lately, I love linear fixtures, like the Griffin Grande Linear Chandelier." One good rule of thumb is to hang pendants 30 to 36 inches above the island surface, 30 inches apart — see our Ceiling Lighting Tips for more placement suggestions.
Under-cabinet lighting is another important consideration in a kitchen lighting scheme because it brightens recessed areas on countertops and makes it easier to navigate the kitchen at any time of day. "Under-cabinet lighting can completely transform a kitchen,” Salceda says, “and working with an architectural lighting specialist is beneficial to getting it right." Visual Comfort offers the expertise of our architectural lighting design specialists, who possess in-depth knowledge and experience in creating the perfect under-cabinet lighting solution.
When you thoughtfully layer ambient, task, and under-cabinet lighting, the result is a kitchen that radiates warmth and utility. Schedule a free consultation today to let our experts guide you in selecting comprehensive lighting solutions to bring your dream kitchen to life.
Shop a curated selection to bring Nicole's style home.


Interested in working with the Eye For Pretty Team? Visit www.eyeforpretty.com
About The Designer
Nicole Salceda's career in interiors began as a passion for making polished, functional design more accessible. She left her job as an elementary school teacher to see those spaces come to life firsthand. What started as a handful of clients quickly became a rapidly growing portfolio full of homes in her signature warm minimalist style. Now, having been through a dream home remodel of her own, she has even more perspective when it comes to the client experience.
Nicole and team—each member hand-picked for their talent—work closely to create inspiring spaces. They assemble elements that are old, new, handmade, and thrifted for homes that are understated, but far from boring. Each refined detail is a testament to Nicole's distinct penchant for bringing a room together—to her eye for pretty.
Eye For Pretty is a full-service interior design studio based in Danville, CA. Nicole Salceda and team serve clients local to the Bay Area. They bring style and expertise to new construction, remodel, and furniture installation projects.